Wednesday, December 31, 2014

January SOTM - This Moment

Hello. It is a new month and a new year. I hope you had a good one. This months blog hop features the stamp set, This Moment. It is only available during this month.


If you are joining the hop from here, keep hopping along until you come back here. If not, you should be coming from {Lucy Kelleher. Next in the hop is {Judy Faye Garner}.


I had so many ideas for this stamp. I may even come back with another post of projects using this stamp. 


My first project is with the hello stamp. I masked off every letter to make each letter a different color. CAS all the way. It's very easy to do this with clear stamps. All you have to do is look through to line up the stamp. No extra thing required like if you were to use wood stamps.


This card features two stamps, masked off to make one image. I took the true from "my aim is true" and love from "love notes". Now there is a swirl on the love that is hard to remove, but it doesn't look that weird with it there.


I wanted to show that you could use this stamp set outside of the love theme. I was thinking fall / Thanksgiving. I got the leaf idea from Pinterest. 
I have some tips on this one. First, I just moved and no matter how well you pack, you still lose something because you're not sure what box it is in. This happened to me. I wanted the words to be gold to match the leaves. I tried using our gold pen to color the stamp. In trials it worked, but coloring the whole word didn't stamp well. So gave up on that. So embossing powder it is. Except I couldn't find my embossing gun. I thought I went through every box I had in the room, but still couldn't find it. So I went old school. My mom used to do this back when I was a kid. Using a toaster. Yes, a toaster. It heats up enough above the toaster to melt the embossing powder. 


Tip two. I seem to lose stamps. Especially when I try to keep things clean. I don't know why but when I clean up, I lose things. Sounds backwards, I know. So I lost the Y in the handwritten Print. So I looked at the other letters to see what I could do. I thought I could turn the X into a Y and it turned out well. Just masked the bottom right part of the X and you would never know.  I also masked the arrows to make them all the same size.


Tip three. You can make your own pattern paper with washi tape. This is what I did. Now this washi tape doesn't quite allow it to lay next together and make a seamless pattern. But how washi tape is made, you can overlap without it being seen. And you can still use your Cricut to cut out the image. I used the poster board setting and it cut it out well.

I used Artbooking Cartridge on this layout. I used the font and welded the letters together. The leafs are image #M473AB. There was a cute leaf with a heart cut out of the center but didn't work well with the pattern paper / washi.

Thank you for joining us today. Now it is time to visit {Judy Faye Garner} for her artwork using This Moment. You can purchase this stamp for $5 when you place a $50 order. Place your order at {nikkageers.ctmh.com}.

Please join my {Facebook group} to get updates on new artwork, tutorials and specials. 

Recipe:

Hello Card

Stamps -
  This Moment S1501

Paper -
   Cards and envelopes X254

Ink -
   Sunset Ink Pad Z2191
   Ruby Ink Pad Z2170
   Gypsy Ink Pad Z2190
   Pacifica Ink Pad Z2192
   Pear Ink Pad Z2197

True Love Card

Stamps -
   This Moment S1501

Paper -
   White Daisy Cardstock 1385
   Heartstrings Paper Pack X7193B

Ink -
   Black Ink Pad Z2105

Other -
   Stuck On You Puffies Z3037

Thankful Layout 

Stamps - 
   This Moment S1501   
   Pathfinding Cardmaking Workshop on the Go G1083 
   Handwritten Print E1030
   You're the Bomb C1617

Paper-
   Colonial White Cardstock 1385
   Kraft Cardstock Z1375
   Pathfinding Paper Pack X7186B

Ink- 
   Sunset Ink Pad Z2191
   Versamark Z891

Other-
   Gold Embossing Powder Z2066
   Gold Sequins Z2012
   Gold Polka-Dot Washi Tape Z1920
   Wood Grain Embossing Folder Z1996
   Craft Heater Z555
   Atrbooking Cricut Cartridge Z1906


Tuesday, December 30, 2014

Cricut Explore Tutorial - Split Image Tutorial

Back again with a new tutorial. I had a request of doing a split image / monogram tutorial. So here it is. I have done 2 images and a font. But the steps are all the same.


Upload the images or font you will be using. Also upload a square. You will be using three of them. I took this picture and realized you only need tow. You can duplicate the other so it is the same size. I am using the heart from Art Philosophy #M46EAC and square from Simply Sweet #M4689F but you could use the free square that comes with Design Space


Take your first square and make it the same size as the image. There is a glitch right now and it will not slice properly if it is larger. It still in the early stages and I do believe they are working on it. Make sure you slice enough of the image for the text and the two rectangles you will be using. If you find out it wasn't big enough. you could slice the image in half and move it. But remember to line it up right when you do it this way. Select the two images and slice. You can not have any hidden images while using slice. Make sure to ungroup and detach and unhide so there is only the one image you are working with. You must have two and only two images to use slice.


Now remove the two parts of the slice image that you do not need. It will leave the image as a whole, with the rectangle cut out.


Take your second square and make it a thin rectangle as long as the image. Duplicate this so it the same for both. You should now have two of these 'lines'. Line them up with the exposed edges of the image. To make sure they are line up, Use the position option in the edit box. Have the x axis the same number. The 'lines' must overlap the original image for them to weld together.


Select all and weld.


Add the text and size to fit within the open area. If you find out that there isn't enough room, this is where you can take a rectangle and slice them in half.  You can then move them to make more room. This is a pain so try to make sure there is enough room when you first slice. You can always do your text, then make the rectangle to fit that and the two 'lines'.


When you are done with your image, make sure to attach if you want it to cut all at once. If you are using different colors, this will not matter. You will have to line it up when you put it all together.


This will work for all images. It will be your preference on how thick you would like the 'lines' and how you would like the text.
The menorah is from Artfully Sent #M1067CD. This will pull up a whole card, so delete what you don't need.

This also works with text if you would like to do split monograms. The hard part about doing fonts is not all fonts will work for this. And some will work if you have the split lower. This is from the Blackletter cartridge. If I did this in the centered middle, you would not be able to tell this was a B. And some letters will not work at all, depending on the font. G is a hard letter to do. So is Q.  You may have to do some playing around to get letters to work.

I hope you enjoyed this tutorial.   Check out my {tutorial page} of other tutorials I have made.

To make sure you don't miss out on any new tutorials, artwork or members only specials, as it is easy to miss posts on Facebook and I don't post to all of them, join my {Facebook group}


Subscribe to my {Youtube Channel} for updates on new Create Your Card videos.

I offer one on one classes for Cricut Design Space. Stop by for more {details}.

Monday, December 29, 2014

Cricut Explore Tutorial - Print Then Cut


Welcome to today's tutorial for the Cricut Explore with Design Space. This is on the print then cut feature. Print then cut give you the ability to print images and have them cut out with the Explore. Now to do this, you must have a printer. The Explore itself does not have the capability to print, it will only cut out the image once it is printed.

Before you can do anything, you will have to calibrate your machine. Once in Design Space, click on the green square up top and choose calibrate. It will then go through the steps to calibrate. It is very easy but if you do need help calibrating your machine, watch the {Cricut Youtube Video}.
The calibration is for the machine. You can print from other printers without having to recalibrate for each printer.
Now that you are ready, lets go into how you can get images to print then cut. You can use Cricut images or upload your own. 


There two options for using Cricut images. They have printable images all set up for you to use. No changes necessary . Those images will have a printer next to the image. Just upload, and hit go to print then cut. (I am using free printable image #M114AC1)

 You can change details of print then cut images by unflattening the image. You must unflatten to do anything extra.

 Once unflattened, you can change colors and to cut, write or score.

 Now not all printable images can be change. This is what this image will do if you go to change it to cut, or change the color. When you change to cut, it will stay the same cut as if it was going to cut after printing. All the detail of this printable only shows in print. Some images are not this way, but some are. The only way to find out is to go to this step.


You can turn any cut image into a print then cut. ( I am using image #M44060 from Artbooking cartridge) You will need to change the color if you would like a different color. Whatever color you choose will be the color it prints. To change the color, go to the layers box and choose the layer you would like. It has basic colors, but you can choose any color you would like. You can also search html color codes to get a specific color. Or use the custom color window to choose the shade.


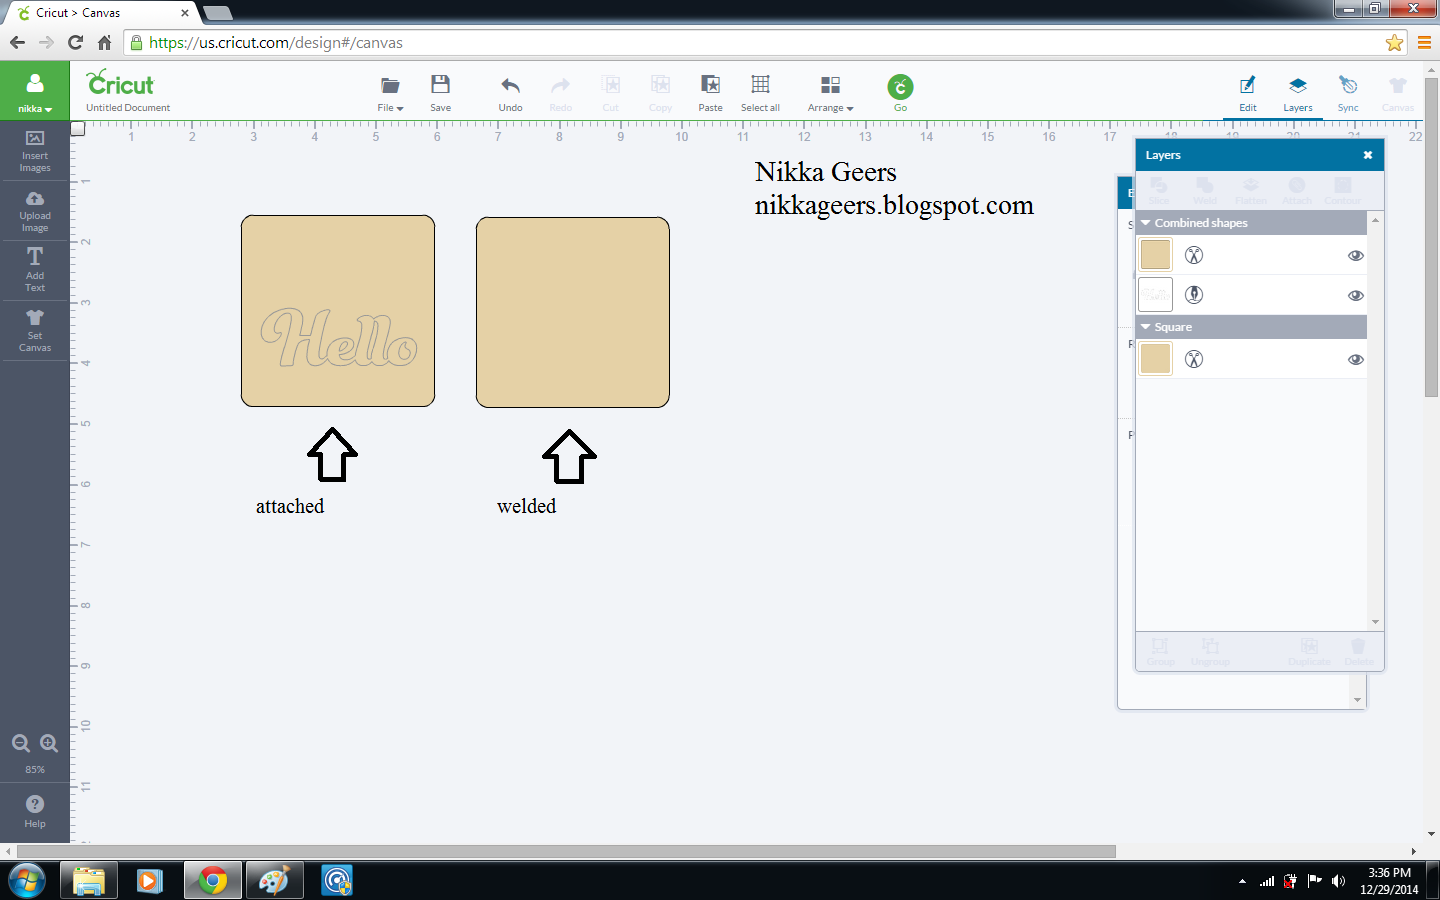
Now as you can see, there is a print option. If you were to do this, it will not attach the layers.


This is how it will cut , and unless this is what you would like it to do, you will need to go back.


  To get it to print all in the same spot, you will need to select all the layers and choose flatten. It will switch all the layers to a single image that will print then cut.
.

 Once you choose flatten, you will have to unflatten to make any changes. All the layers should show up in one layer. If you have multiple layers showing, go back and flatten them together.

You can upload images to print then cut. Any image you can upload can be printed, including svg.
When you go to do a basic upload, it will give you the option of what complexity you would like. Choose complex images to keep all the details and colors as they are. The other two will lower the color ranges and will not be so detailed. 

Once you have cleaned up the image, make sure to save correctly to have it print the image. It will automatically have the preserve image button checked. If you see just red lines in the image preview, not the whole image you would like, make sure this box is checked.

Now if you upload a picture and it saves a print file and you want to change it to cut, here is what you do. On the top of the edit box there is a unflatten option. Click that.

Then pull up the image and change to cut.

Once you hit go, this is the preview mat.  Make sure these three things are shown to have it do print then cut.  On the mat preview, there should be three L shaped icons. Those are the registration marks. The second will be the print and cut icons on each mat. The third will be the size on the bottom.  Right now we can only do print then cut on a 8.5 by 11 inch paper. They will be updating sometime in the future to include more sizes.  Also what browser plays a part of how big you can print. Remember, the 8.5 by 11 sheet need to include the registration marks so you can't print 8.5 by 11. here are the following sizes each browser can print.
Chrome 5.5 x 8
Firefox 6 x 8.5
Safari 6 x 8.5
Internet Explorer 6 x 8.5


Now you can print more than one image at a time, as long as it fits within the given measurements for the browser. Do note that print then cut is still in the early stages and sometimes it does not want to work if the print is too detailed or has too many images.  You can easily change the quantity on the mat preview.


Now when you are looking at the mat preview, the image may not look the same way it does when you were designing. That is because Design Space uses a bleed to make sure there is no white edge when you go to cut the printed image. It takes whatever color is on the edge and extends that color past where it will cut. You can choose to remove this bleed by going to settings on the top of the screen and unclick the bleed option.

It will prompt you to keep the bleed for optimal results.  You can temporarily use this option to double check what the image will print like if you are unsure. As you can see, there is all the detail in the image. Remember to click the bleed option back on to use the print then cut to the best abilities.  Now the cut calibration on this machine is amazing and most of the time you will not even need the bleed. But why not use it when you have it, you know, just in case.


Once you are ready to go, this is the next screen that will come up.  Again make sure there are registration marks being printed. You will have two options on top, print and cancel. You can cancel the print step and it will bring you straight to cut. Use this option if for some reason it did not start the cut option. If you change the sizes in any of the steps, this will not work. It has to be the exact size and placement for the machine to cut without reprinting.
Make sure that the paper size is 8.5 x 11. Do not change this size for any reason. And make sure you are printing on a 8.5 x 11 sheet of paper. It will not print right if you do not use these sizes for the print size and the actual paper size. And if it does not print right, it will not cut right.
Double check to make sure it is going to the right printer, and that it is printing and not going to a pdf file.
Once you are ready, click the print button.


This is the cut screen. Once it is ready, go through the prompts to cut the image. There is an option to reprint the page, and it will bring you back to the screen right before this one.  You can also keep reloading and hitting go to cut more than one sheet. I have read this is the best option for when you are printing more than one sheet of the same images.


This is what it will print out. Again make sure there are the three registration marks, The machine will not be able to cut without these. 


When placing the paper on the mat, place just inside the lines as shown. This will help the machine read them a little better. If you are having problems with the machine reading the marks, try this as your first step.


Once you load the mat, your machine will start reading the marks. This is what the light is for, it is the sensor. 


And the image one it is cut. There are no white edges, which is hard to tell with this image. If you find that the machine isn't cutting within the area it is suppose to, redo the calibration. 

Some troubleshooting.
Cricut recommends that you print and cut from the same computer in the same session. Not following this may effect you project. 
Check the lighting. It may be getting to much or not enough. Adjust accordingly.
Print on white paper. Colored paper may make the registration marks not as visible.
Stay in the same browser. Changing browser may change the position of the registration marks.
Printing to pdf may do the same.
Use inkjet only.
Update firmware and adobe flash.
If you have tried all of these and you are still unable to print then cut, call customer support. I have used them and they are amazing. That is one of the differences between companies. I have heard complaints about other companies customer service. I have never had a problem, and now that it has changed over to Ashish Arora, it is even better.

Now the tutorial is done. Now is the part where I recommend a product. I am not getting paid for this. This is just me purchasing the product on my own and loving the results so I would love to share with you. Since I have had recommended it, they have seen an increase of Explore customers, maybe I should get paid. LOL.

I am using waterproof printable vinyl for {texascraft.com}. It is amazing. It comes in permanent and removable. You can order by the sheet or by the roll. There are also different sizes, depending on what kind you choose. Removable comes in 8.5 by 11 sheets. I am using the permanent.
 Now normally you should let any vinyl cure for at least 2 days before washing or getting wet. But I wanted to test this out and see what it could do. These tests were done immediately after printing. No time to let dry or cure.
 Now normal printable vinyl you should let it dry a bit before cutting so it doesn't ruin the image. With this, it was dry to the touch immediately  No need to let it dry. I was also able to use transfer tape. Many people have not been able to use transfer tape with other printable vinyl because it will come off. I placed it on a jar and had fun testing. 


You can run it under water with no problem. 


I tested with a scrubby. This did have a little bit of a problem.


It did remove some of the image.  But I did use the scrubby with a lot of pressure for about 30 seconds. Not bad at all considering.


This is after going in the dishwasher. Top shelf of course. But you couldn't even tell. It even stayed on. Remember, This is without letting it cure. It was about 5 minutes after I printed. I would still recommend hand washing, just in case, but still. I would love to see Cricut printable vinyl do that.

I hope you enjoyed the tutorial on print then cut. Check out my other {tutorials}.

To make sure you don't miss out on any new tutorials, artwork or members only specials, as it is easy to miss posts on Facebook and I don't post to all of them, join my {Facebook group}


Subscribe to my {Youtube Channel} for updates on new Create Your Card videos.

I offer one on one classes for Cricut Design Space. Stop by for more {details}.
I have used Close To My Heart Artbooking cartridge Z1906. You can order yours at {nikkageers.ctmh.com}

Cricut Explore Tutorial - Attach verses Weld

Back again with a brand new tutorial.  This one is about attach and weld. There is a big difference between the two.

When you attach an image, it is like paper clipping them together. They will stay in the order you had them. Welding is like gluing them together. They become one image.


Both attach and weld are found at the top of the layers box. We will start with these two images heart (#M46EAC) and square (#M41949)


This is when you weld the two images together. It becomes one image. 


This is what the cut screen will look like.


This is what it looks like when you attach two images. Notice how it still looks like two separate images because they are still separate images.


This is how the cut screen will look when you attach the two images.


When you cut them out, you can really tell the difference. The top is the attached image. It cut both images separately and where they overlapped got cut too. This ended up making 3 images.
The bottom is the welded image. It cuts out as one image.


Here is the attached image shown apart. the square got cut out and the heart got cut out and it cut where the image overlapped.


 Here is writing on an image. You will use attach to keep the writing on the image, for example if you are adding text to a card. Where ever you place the text on the image is where it will stay when you attach.  If you were to weld the text to the square, the text will disappear.  And it will not cut or write.


Now when you go to weld, the images must be overlapping for them to weld together.  The first image is welded without touching. It will not cut out as one image. The second image is properly welded together and will cut out as one image.


When using attach with text or image as a cut, the two will become the same color. This will have the word or image cut out exactly where it is laid. 


When you go to the cut mat, it will show up as one image when attached. If not attached, it will cut separately. I changed the color of the text to show it on the same mat. If you where to keep it black like the photo above, it will cut out on a separate mat. This is how it will also look if you go to write the text instead. If not attached, it will write separately.


This is the same for images and text. If you want them to show in the same position as on the design canvas, you will want to attach. 


This is the cut screen when you don't attach. It will go to space saver and everything will be all jumbled. If this happens when you don't want it to, go back and attach.

I hope this explains the difference between attach and weld. Remember, the main screen is the design canvas and placement on there will not be the same as the cut mat. You will want to attach if you want the placement to be the same. Once on the preview cut mat, you can move the group all together where you would like if you do not want it up in the top corner.

If you attach items but use the eye to hide the layer, it will not keep that once you go to the cut screen. For example, you are using a square to lay out where you want the text to go on an envelope. Once you hide that square, it will not keep that placement. It will still go to the top corner. Now you can change the square to score and leave out the score tool and it will leave nothing when it comes to that layer and keep the placement as you had it. 

I want to update this to include print option. When it comes to a printable file, you will not have an option to attach. So if you want to keep teh same placement as on the design canvas, here is what you do.

When you select all, it does not give you the attach open. All you have is flatten.


Choose flatten and it will flatten everything you have on the screen


This will be what it looks like on the cut preview mat. Exactly how I laid it out.

 Hope that answers all your questions on attach and weld. To see all the other tutorials, check out my {tutorial page}.

To make sure you don't miss out on any new tutorials, artwork or members only specials, as it is easy to miss posts on Facebook and I don't post to all of them, join my {Facebook group}


Subscribe to my {Youtube Channel} for updates on new Create Your Card videos.

I offer one on one classes for Cricut Design Space. Stop by for more {details}.

I have used the following Close To My Heart Cricut cartridges.  Please visit {nikkageers.ctmh.com} to order yours today.

Art Philosophy Z1686
Artbooking Z1906